


-
 Vaporshop
All Categories
Vaporshop
Vaporshop
All Categories
Vaporshop
- Top 10 Vaporizers
- Spare Parts & Accessories
- AirVape XS GO (2021)
- Arizer Air MAX
- Arizer Extreme Q
- Arizer Solo 2
- Arizer V-Tower
- Arizer XQ2
- Boundless CFC 2.0 Vaporizer
- Boundless CFX
- Boundless TERA (V3)
- CRAFTY+
- DaVinci IQC
- Dr. Dabber Boost EVO
- DynaVap VapCap "M" PLUS 2023
- DynaVap VonG (i) Titanium
- Flowermate Aura
- Flowermate Cap Pro
- Flowermate Slick
- Flowermate V5.0S Pro
- G Pen Elite II
- G Pen Micro+
- G Pen Roam
- Hyer Big-E Rig
- MIGHTY+
- PAX Mini
- PAX Plus
- PLENTY
- Puffco Peak Smart Rig
- Puffco Plus
- Storm Vaporizer
- The Proxy (Puffco)
- VOLCANO CLASSIC
- VOLCANO HYBRID
- Vapman 2.0
- Vapman Click
-
 Smartshop
All Categories
Smartshop
Smartshop
All Categories
Smartshop
- Top 10 Smartshop
- Zamnesia Gift Cards
- After Party
- Aphrodisiacs
- Aromatherapy
- Blue Lotus
- CBD Vape Juice
- Capsule Machines
- Crystals, Gemstones & Minerals
- Dream Herbs
- Drug Tests
- Extracts
- Happy Caps
- Herbal Tea
- Herbs & Seeds
- Incense
- Kanna
- Kratom
- LSA Seeds
- Mescaline Cacti
- Microdosing
- Nootropics
- Relaxing
- Salvia divinorum
- Smart Seeds
- Stimulants
- Supplements
- Tinctures
- Vape Herbs
-
 TRIBE
All CategoriesTRIBE
TRIBE
All CategoriesTRIBE
- My Membership
- Spend Gift Points
- TRIBE Sale
- Exclusive products
- Earn Extra Gift Points
- Early Access
- Refer a Friend
- Information
 United States
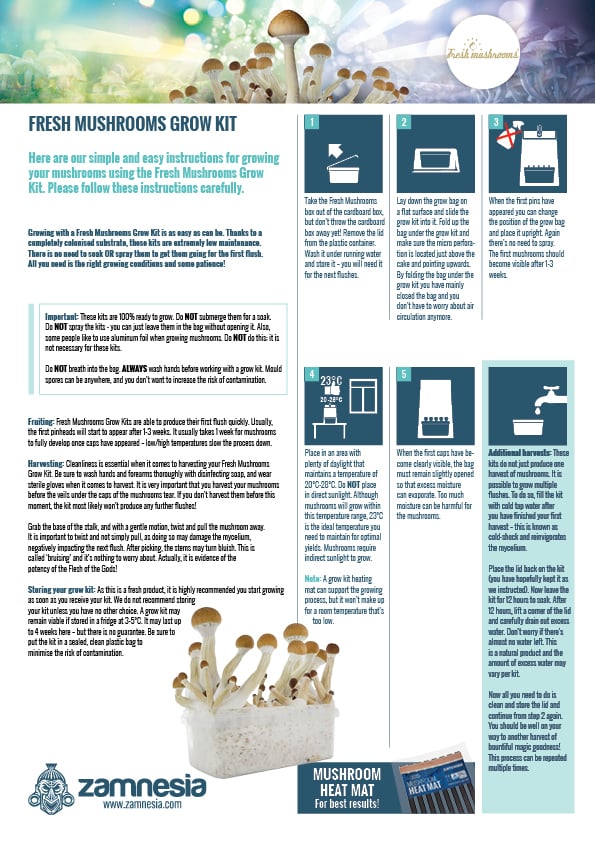
How To Grow Zamnesia Classic Magic Mushroom Grow Kits


Here are our simple and easy instructions for growing your mushrooms using the Zamnesia Classic Classic Grow Kit. Follow these instructions precisely.
Please note: You are currently on the instructions page for "Zamnesia Classic" brand grow kit. Please be aware that "Zamnesia Supreme", "Ready-2-Grow Bag", and "Copelandia" grow kits each have their own instructions.
Before we get to the main part, let's have a closer look at the content of our grow kits. They are filled with 100% colonized rye to allow for the biggest possible yields.
We highly recommend you start the growing process immediately after receiving your kit. If you don't want to (or can’t) grow right away, you will need to put your kit in the refrigerator. 3–5°C will keep it in “hibernation mode”. At this temperature, the grow kit can be stored for a maximum of 3 to 4 weeks.
Important: if you store it, keep the grow kit in an airtight plastic bag to prevent contamination.
OK, now that we have covered the basics, let's move on to the actual task of waking up the sleeping magic ambassador.
You will need:
-
Clean tap water or mineral water
-
A bright spot to place the kit in (not in direct sunlight)
Optional:
Get them going:
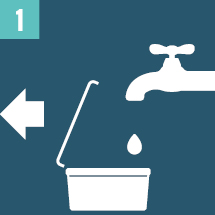 |
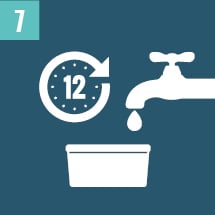
STEP 1Remove the lid from the grow kit and pour water on the grow kit until the container is completely filled. Put the lid back on and let it soak for 9–12 hours, preferably in a cold place like the refrigerator. |
 |
STEP 2After 9–12 hours, remove the lid from the container and clean it under running water. Don't throw it away, you will need the lid later. Drain all excess water from the kit. |
STEP 3Pour approximately 150ml of clean tap water into the grow bag. Place the grow kit into the grow bag with the water. Spray water on the inner sides of the bag only once during setup. It’s very important to keep the humidity level correct at all times. Optimal relative humidity is 85–100%. |
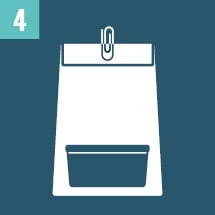 |
STEP 4Fold the top of the grow bag twice (about 3cm) and fasten with paperclips. Place the bag in a bright place. Choose a warm spot between 23–27°C with access to indirect daylight, never direct sunlight. A good place to put the kit is somewhat higher on a bookshelf. |
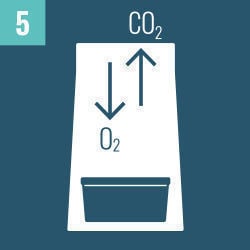 |
STEP 5Once the first pins have appeared, refresh the air by opening the bag 1–3 times a day. Mushrooms grow on oxygen and therefore need fresh air daily to grow properly. Any CO2 buildup will be removed when opening the bag. |
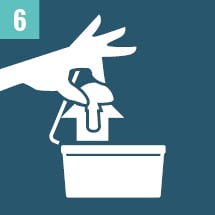 |
STEP 6After 2–4 weeks, your mushrooms are ready to harvest. Harvest all mushrooms, even the tiniest ones, just before the veils underneath the mushroom caps start to tear. THIS IS VERY IMPORTANT! To learn more about the perfect harvesting moment check out this blog article |
 |
STEP 7After harvesting the first flush you can prepare the kit for a new flush. Usually a grow kit will produce about 3 flushes. To prepare the kit for the next flush you have to soak it again as described in step 1. From there you can repeat the same process. |
Additional information
Depending on the growing conditions and strain type, it can take anytime between 1 to 2 weeks before you see the first tiny pins. Temperatures below/above the ideal values will slow down the development of fruit bodies.
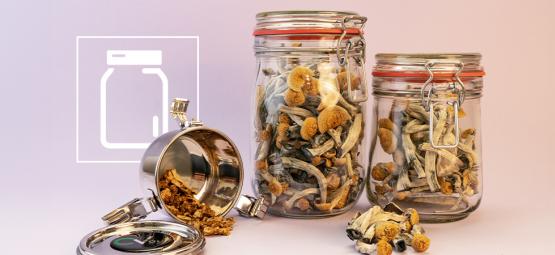
Clean harvesting
When handling your grow kit, you should keep an eye on cleanliness. Before taking the grow kit out of the grow bag to harvest your mushrooms, you should always wash your hands (and to be on the safe side, your arms). Be meticulous, wash your hands with soap, use a disinfectant gel afterwards, and slip sterile gloves on to prevent contamination. Wearing a face mask is also a good idea. Always make sure to use a clean growing area too.
-
 6 min
11 December 2025
What is mycelium?
Before mushrooms come mycelium, the hidden network that gives life to every psilocybin species. Discover what mycelium is, how it grows, and why this underground web is key to cultivating magic mushro ...
6 min
11 December 2025
What is mycelium?
Before mushrooms come mycelium, the hidden network that gives life to every psilocybin species. Discover what mycelium is, how it grows, and why this underground web is key to cultivating magic mushro ...
-
 6 min
2 May 2025
How to prepare for a safe psychedelic trip
Psychedelic experiences benefit from knowledgeable and careful planning. It doesn't need to be over-the-top, but a little prep can make a trip absolutely wonderful. Find out how to prepare for a safe ...
6 min
2 May 2025
How to prepare for a safe psychedelic trip
Psychedelic experiences benefit from knowledgeable and careful planning. It doesn't need to be over-the-top, but a little prep can make a trip absolutely wonderful. Find out how to prepare for a safe ...
-
 5 min
29 July 2024
How To Store Magic Mushrooms
If you want your shrooms to stand the test of time, then you'll need to not only dry them properly, but store them adequately too. While not difficult, it is important to get this right if you want th ...
5 min
29 July 2024
How To Store Magic Mushrooms
If you want your shrooms to stand the test of time, then you'll need to not only dry them properly, but store them adequately too. While not difficult, it is important to get this right if you want th ...
-
 5 min
26 April 2024
How To Sober Up From A Mushroom Trip
Shroom trips are very often enjoyable experiences, and when they're not, it's nowhere near as bad as popular culture would have you believe. But sometimes, we might want to come down early. While you ...
5 min
26 April 2024
How To Sober Up From A Mushroom Trip
Shroom trips are very often enjoyable experiences, and when they're not, it's nowhere near as bad as popular culture would have you believe. But sometimes, we might want to come down early. While you ...
-
 4 min
22 April 2021
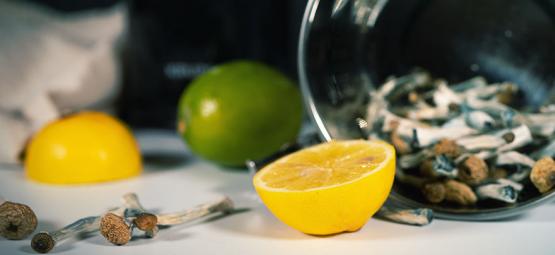
How To Make Lemon Tek For A Faster Mushroom/Truffle Trip
Sometimes, you just want to come up hard and fast. Luckily, there's a way. If you're after mind-bending trips in under twenty minutes, you've come to the right place. Just make sure you're prepared fo ...
4 min
22 April 2021
How To Make Lemon Tek For A Faster Mushroom/Truffle Trip
Sometimes, you just want to come up hard and fast. Luckily, there's a way. If you're after mind-bending trips in under twenty minutes, you've come to the right place. Just make sure you're prepared fo ...
-
 2 min
29 May 2018
How To Make Magic Truffle/Mushroom Tea
Tea is an ideal way to ingest the magic - it is tasty, gentle on the stomach and absorbs faster. What’s not to like? ...
2 min
29 May 2018
How To Make Magic Truffle/Mushroom Tea
Tea is an ideal way to ingest the magic - it is tasty, gentle on the stomach and absorbs faster. What’s not to like? ...


