


 United States
 To Clean Your Grinder")
How (And Why) To Clean Your Grinder

If you frequently enjoy cannabis, you know how important it is to keep your smoking paraphernalia clean and in good working order. But this doesn’t just apply to smoking devices like bongs and pipes. It’s also important to clean your grinder regularly.
A grinder is an essential tool for any keen cannabis enthusiast. It ensures bud is ground up for the maximum surface area, as well as making it easy and convenient to fit into a vape, bong or joint. Yet grinder cleanliness is something often overlooked. We take a look at why it's important to clean your grinder, and how you can do it.
 view product
WHY SHOULD YOU CLEAN YOUR GRINDER?

Every time you use your grinder, a little bit of sticky resin remains on the teeth. The icky stuff that accumulates over time won’t just affect how well you're able to grind your weed; there are several other reasons you should aim to keep your grinder clean.
A DIRTY GRINDER IS BAD FOR YOUR HEALTH
Cannabis buds are organic matter just like food—and organic stuff can spoil and rot. Over time, bacteria and mould will start to grow on the residue sticking to your grinder. Since you’re using a grinder to mill up weed that you’ll be smoking (or vaporizing), you don't want the bad stuff making its way into your body. So one very good reason to keep your grinder clean is to eliminate the risk of getting sick.
A CLEAN GRINDER WORKS BETTER
Another good reason is, of course, that a clean grinder will work better than an icky, sticky one. When the teeth of the grinder are covered with resin and crud, it simply can’t do a good job processing your buds into small, homogeneous particles. You will also find it much harder to physically use the grinder if it’s clogged or jammed. A clean one will grind smoothly and with ease.
CLEANING EXTENDS THE LIFESPAN OF YOUR GRINDER
Plant matter, sticky resin, dirt, etc. can get anywhere. It can clog up the turning mechanism, make the teeth dull, and generally give your grinder a bad appearance. This, in turn, can culminate in a less functional grinder that deteriorates more quickly. To avoid having your device meet a premature end, keep it reasonably clean between sessions.
HOW OFTEN SHOULD YOU CLEAN YOUR GRINDER?

Ultimately, this will depend on how often you use your grinder. In general, it’s a good habit to give your grinder a thorough clean every month or two, with casual routine cleaning in-between to keep particles from jamming anything.
Then again, for the heavy tokers among us who engage in a significant amount of grinding action every day, frequent weekly cleans may be needed to keep your grinder in good working order.
THE PARTS OF A GRINDER

Grinders appear in different forms and are made from different materials. Most high-quality weed grinders come with three chambers—one for grinding, one for catching the weed, and a final chamber below a pollen sieve to hold the kief. Some only contain two chambers—without a kief-catcher—and are marketed for their simplicity and ease.
The teeth inside the grinder, also known as pegs, can take on various shapes in hopes of rendering the material into an optimal shape. There are even more extravagant (and cheap, for that matter) models out there that feature additional chambers and screens, new technology, or top-tier materials. Even some budget grinders come with a section on top where you can store your bud and keep it secure with an included lid.
Taking all this into account, a grinder can consist of several pieces. And for a good cleaning, you need to pay attention to every one of them. Before you start cleaning, make yourself familiar with all these parts and how they fit together.
WHAT YOU NEED TO CLEAN YOUR GRINDER
- Isopropyl alcohol (for metal grinders)
- Purilizer grinder cleaner
- Salt
- Sealable plastic bag
- Tray or plate to collect kief
- Container for your kief
- Toothbrush
- Towel
- Toothpick or dab tool
- Freezer (optional)
- Screwdriver
BEFORE YOU START: TAKE YOUR GRINDER APART
As we don’t want to do some half-assed cleaning job, we need to take the grinder apart. Disassemble your grinder (if needed, use a screwdriver for this, but be careful not to damage the screens). Make sure you know where the parts go. After taking your grinder apart, lay out all the pieces in front of you.
As you disassemble, be careful as some parts can be fragile. Be especially careful not to poke holes in the screens as this would render them pretty much useless. Just pay attention to what you’re doing and don’t be a klutz.
HOW TO CLEAN YOUR GRINDER: 3 STEP-BY-STEP METHODS
Now it’s time for the interesting bit: how to clean your grinder. We’ll go over the best and most effective cleaning methods you can perform right at home. But know that the best method also depends on the material your grinder is made from. For metal grinders, we’ve found that cleaning with Purilizer or alcohol (see below) gives the best result. For plastic grinders, you can use water and some dish soap (optimal).
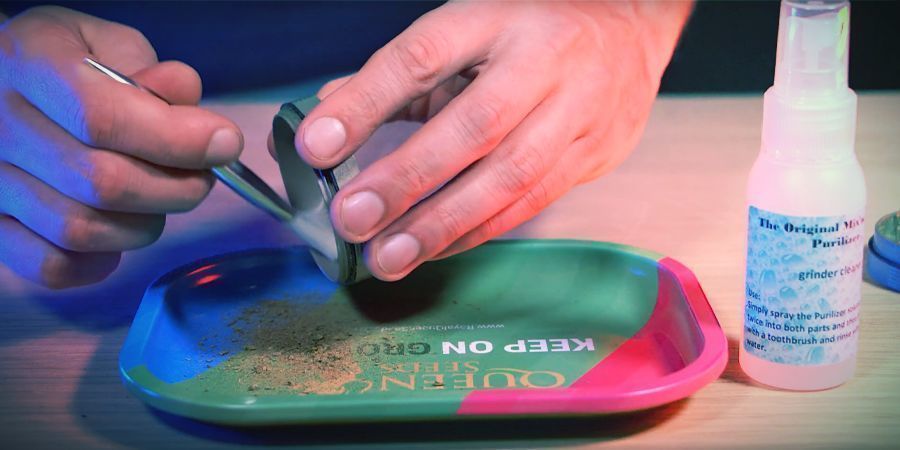
USING GRINDER-SPECIFIC CLEANER

This method works for metal and plastic grinders, and provides excellent results.
-
Place all the grinder parts on a tray. A rolling tray works best, but you can use any other appropriate flat surface.
-
Use a toothbrush and/or toothpick to scrape out the larger pieces.
-
Collect the kief and DON’T TOSS ANYTHING OUT! Unless the stuff you scrape is very old, mouldy, or smelly, you’ll want to collect all that good kief to smoke later! This is also the reason we’re using the tray, so you don’t lose any of the stuff that falls out.
-
After you’ve brushed and scraped out all the good stuff, put the grinder parts on a towel.
-
Spray all the parts, the lid, the chambers, and screens with Purilizer grinder cleaner.
-
Wait around a minute. Now, use the toothbrush to brush off all the parts, making sure the mesh screens in particular are clean. All the parts should look like new!
-
Give everything a rinse with warm water. Afterwards, lay out the parts so they can dry completely.
-
Reassemble the grinder—done!
THE ALCOHOL IN A BAGGIE METHOD

Another good cleaning method, especially for metal grinders, is the “alcohol in a baggie” method. Here’s how to do it:
-
Get a large sealable baggie that can fit all your grinder parts.
-
Put all the parts, except for your screen(s), in the bag.
-
Pour about 1–2 tbsp. of salt into the bag.
-
Fill the bag with isopropyl alcohol or 70% rubbing alcohol so that all parts of the grinder are submerged.
-
Close the baggie. Make sure it’s tightly sealed and that no alcohol can come out.
-
Take the bag and swish the whole thing around for 30 seconds to a minute. Don’t be too forceful as you don’t want any grinder parts to break or your bag to tear.
-
After some nice shaking action, open the bag and take out your now sparkling-clean grinder parts.
-
Rinse the parts under some warm water.
-
Now, using a toothbrush and the alcohol, give your screen(s) a good scrubbing, then rinse under warm water and let dry.
-
Reassemble your grinder—done!
THE GRINDER IN A POT METHOD

This is a good cleaning method that works well for plastic grinders.
-
Put a pot with water on the stove and drop your grinder pieces in it.
-
Heat the water to boil. As soon as it reaches this point, immediately reduce the heat to a gentle simmer—you don’t want to melt your grinder! “Steep” your grinder pieces in the hot water for an additional minute or so.
-
Turn off heat. Use tongs to remove the grinder pieces from the hot water. Careful!
-
Place the hot pieces on a towel and let them cool down.
-
When the pieces are cool enough to touch, set them somewhere so they can dry fully.
-
Reassemble your grinder—done!
EXTRA TIP: FREEZE YOUR GRINDER TO MAKE CLEANING EASIER

This isn’t really necessary, but it makes cleaning your grinder with a brush and toothpick a lot easier! Put all the pieces of your grinder in your freezer for 30 minutes. During this time, the sticky stuff on your grinder will harden so you can get it off much easier. Try it out, as this additional step can make a big difference! It also makes it easier to collect the leftover kief.
Keep your bongs, pipes, and grinders clean and well-maintained so you can enjoy them for months and years into the future. You will be rewarded with a healthier smoke, a better taste, and easier use every time.
-
 5 min
11 October 2021
Top 10 Weed Grinders
Grinders have revolutionised cannabis preparation. No more resin-dulled scissors and black fingertips. No more waiting for that mix to be fine-tuned. Load, then twist, and perfectly fluffy buds are...
5 min
11 October 2021
Top 10 Weed Grinders
Grinders have revolutionised cannabis preparation. No more resin-dulled scissors and black fingertips. No more waiting for that mix to be fine-tuned. Load, then twist, and perfectly fluffy buds are...
-
 4 min
17 October 2016
An Ultimate Guide To Grinders
An exhaustive guide on grinders. You will find out how to best choose a grinder so it suits your needs; also, you will find information on what to look for and what to avoid.
4 min
17 October 2016
An Ultimate Guide To Grinders
An exhaustive guide on grinders. You will find out how to best choose a grinder so it suits your needs; also, you will find information on what to look for and what to avoid.


