


 United States

How To Take Magic Mushroom Spore Prints

In order to grow magic mushrooms from scratch, you need spores. It's from these tiny things that everything else grows! Taking your own spore print is easy enough, and can be the beginning of a great adventure. Find out how with our step-by-step guide.
Growing things is a wonderful experience. And if the things you grow also induce life-changing, psychedelic experiences, then it’s even better!
Growing magic mushrooms from scratch is a relatively involved but highly rewarding endeavour. Once you’ve mastered it, you can basically supply yourself with an infinite amount of shrooms for as long as you want, pulling in gigantic crops—or “flushes”. But these huge flushes begin life as microscopic spores, without which, none of it could happen.
In this article, we’ll explain what a magic mushroom spore print is, and how to take your very own!
What is a spore print?

A spore print is a method of taking and storing spores from mushrooms. Spores can be thought of as fungal seeds; they disperse into the air and drift around, and the ones that find somewhere hospitable begin to develop. In the case of Psilocybe mushrooms—magic mushrooms—spores will begin to develop into mycelium, which will eventually produce magic mushroom fruits!
Taking a magic mushroom spore print is incredibly easy—you only really need to watch your cleanliness. And once you’ve got one (or some), they can keep indefinitely.
When to take a spore print?
A spore print is best taken as soon as the veil drops on a mushroom. The veil is the membrane on the underside of the cap that breaks on a mature mushroom and releases spores into the air. Once the veil drops, the mushroom will essentially begin to die.
Though you needn’t wait up all night watching for the first signs of breakage, getting in there early will render you a cleaner print. The longer the membrane stays broken, the more opportunity other fungal spores and bacteria have to get in there and contaminate the mushroom, which will then contaminate your spore prints.
Cleanliness is crucial!
On that note, it’s hard to overstate how important keeping a sterile environment is when taking and storing spore prints. You want your print to exclusively be a magic mushroom spore print, not a print of myriad moulds. If carried out in open conditions, fungal spores from the air will also make their way onto your print, and when you come to use it later, they will also be vying for the environment you’re inoculating.
If you take a dirty spore print, your venture could be doomed before it even really begins. So at every stage, don’t cut corners with cleanliness!
How to make a spore print

So, with the preliminary information out of the way, it’s time to examine how to take a magic mushroom spore print. As with most pursuits, it’s really worth getting this first step in magic mushroom cultivation right. The spore print literally contains the things from which your magic mushrooms will grow, so you don’t want it to be anything other than perfect.
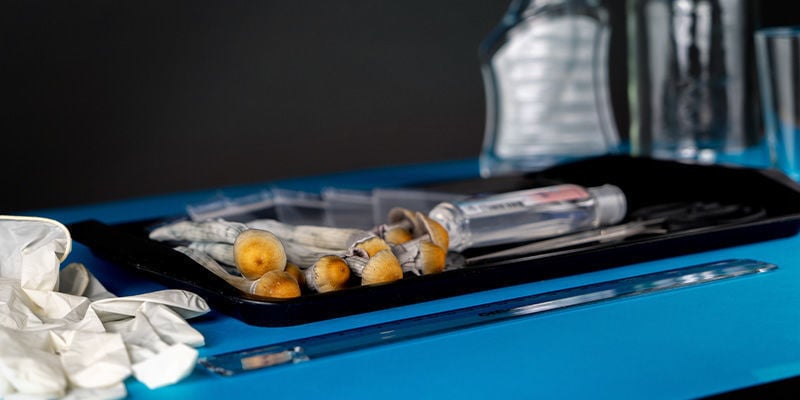
Equipment
- Magic mushrooms
- Aluminium foil
- Scissors
- Sanitiser spray
- Alcohol gel
- Flat serving tray
- Glass jar
- Drinking glass (one per print)
- Tweezers
- Scalpel
- Zip-lock bags (one per print)
Instructions
1. Choose a small section in your house that is easy to clean and close off, for example the bathroom. Give the room a proper deep clean and sterilise your work area with the sanitiser. Make sure you are clean too: showered, hair tied back, fresh clothes, and don't forget to thoroughly clean the hands with alcohol gel. If you have the luxury of using a glove box or air flow hood, do so.
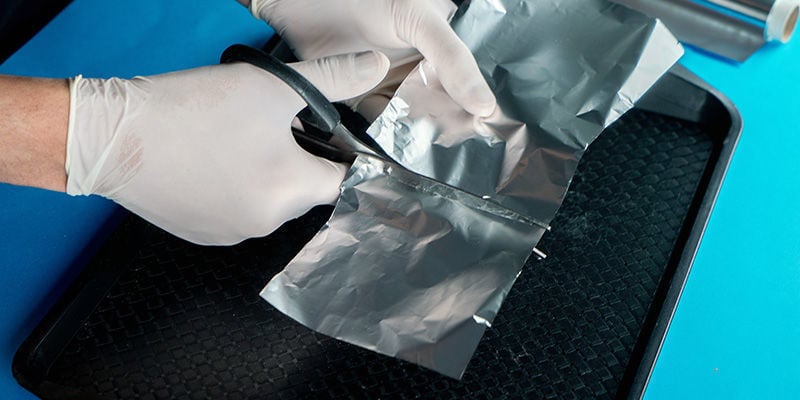
2. Cut 10 × 10cm squares of tin foil—two for each print you will be making. Place these in the glass jar, cover the jar with some more foil, and pop it in the oven at 250°C for an hour or so to sterilise them. Let them cool.
3. Next, disinfect your equipment. Use the sanitising spray on all surfaces, the serving tray, glasses, and tweezers. Sterilise the scalpel over the gas burner or with the alcohol gel.
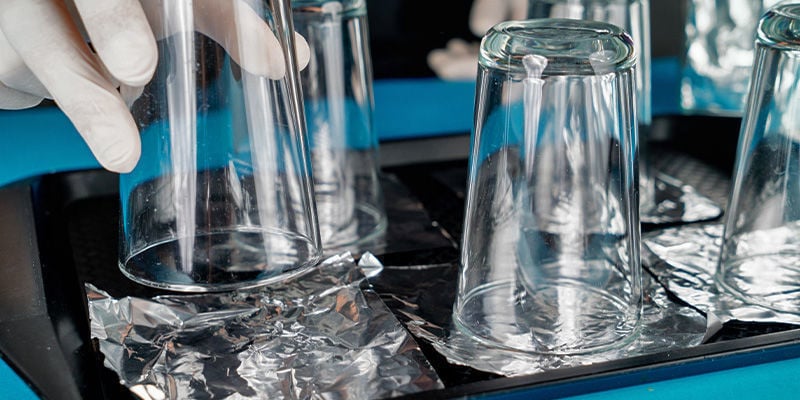
4. Use the tweezers to take out half of the squares of foil, one by one, placing them on the serving tray, shiny side up. Place a glass over each square and close the jar back up with foil when you are done.
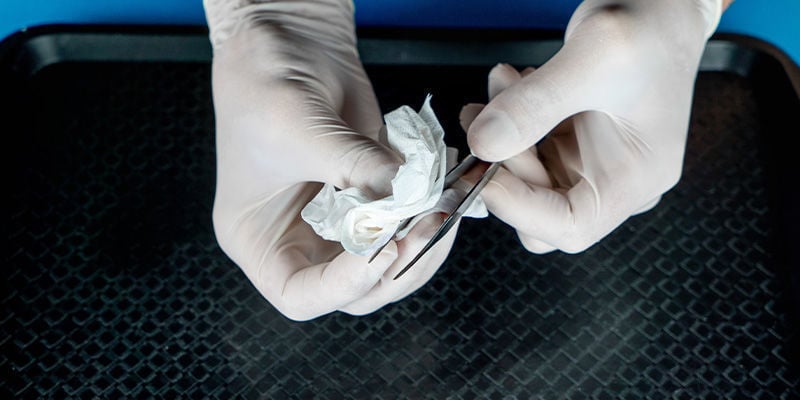
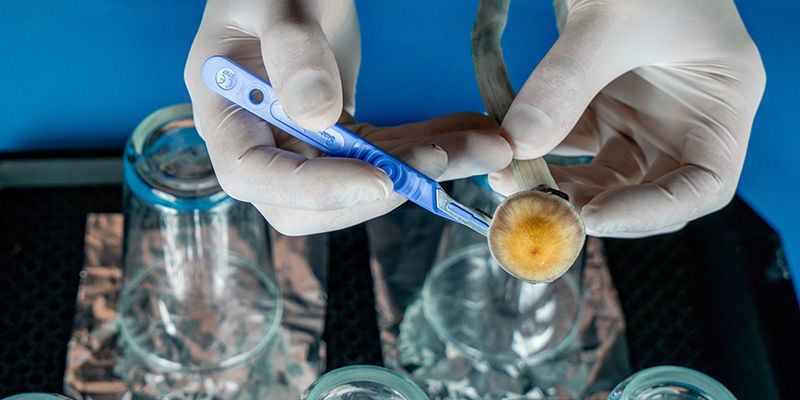
5. With the scalpel, separate the cap from the stem. Cut as closely to the gills as you can, but be careful not to damage them in the process. Remove the glass from the foil square and place the mushroom cap, gills facing down, onto the foil. Now, replace the glass to cover it.
6. If necessary, carefully move the tray to a secure area, and leave it untouched for 36 hours. In this time, the spores will drop from the gills and settle on the foil.
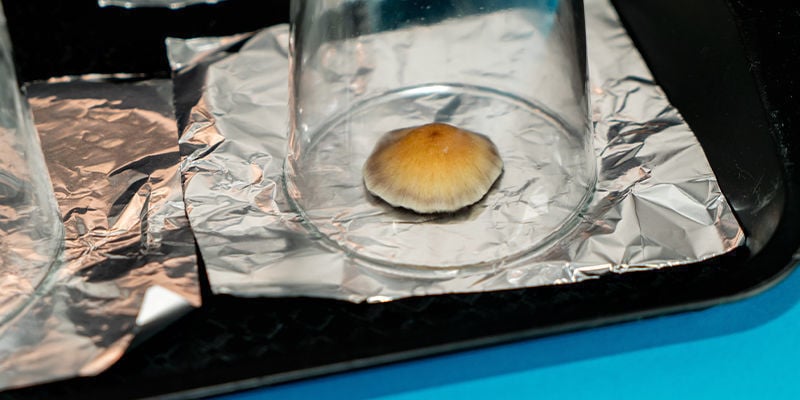
7. Coming back to your project, make sure that you are clean with sanitised hands, tools, and work surfaces. With the tweezers, poke into the cap, being careful not to move it at all or stab the foil underneath. Lift the cap straight up, put it to the side, and place the glass back over the print. Mind you, the caps are still good to use!

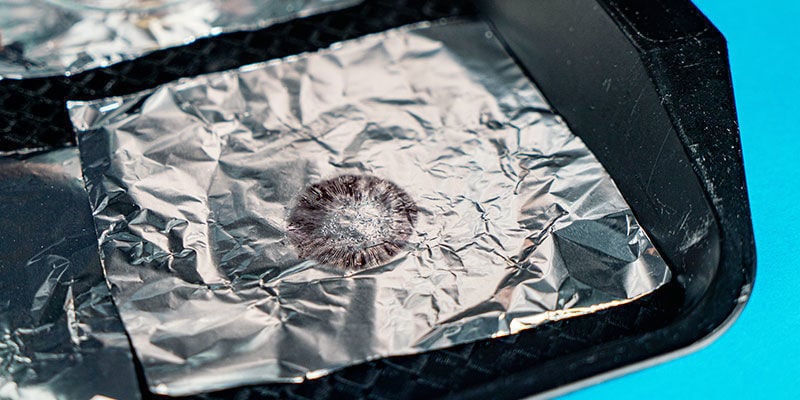
8. Put the tray somewhere where it is safe to dry for a further 24 hours.
9. Once again, make sure everything has been sterilised before moving forward. Be sure to (re-)sterilise the tweezers, scalpel, ruler, and all surfaces.

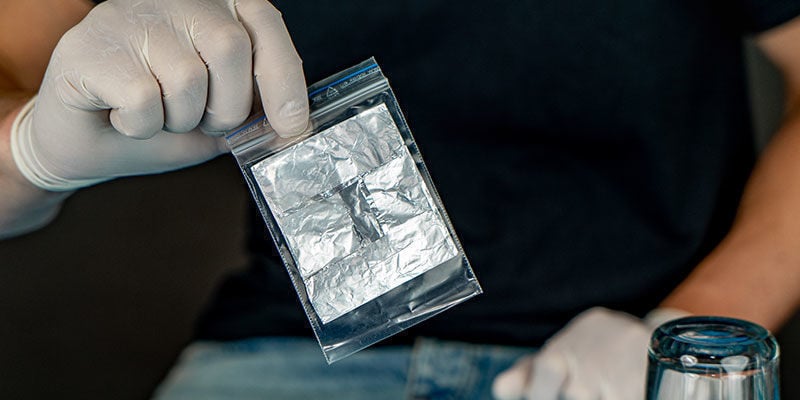
10. Use the tweezers to remove the second piece of foil from the jar, and place it, shiny side up, over the top of the spore print. Then, fold over each edge (without damaging the print in the centre) to create a secure package with the spore print inside. Place it into a ziplock bag, seal it, and then label the bag with a marker pen. Store in a cool and dark place.
How long does a spore print last?
A very long time. In fact, a spore print that is stored properly can last indefinitely. There are reports of spore prints being used many years after they were taken, and still developing into healthy mushroom colonies.
It all depends on how they’re stored.
How to store a magic mushroom spore print
Fortunately, storing a shroom spore print is very easy.
Like much organic material, spore prints like to be stored in a cool, dry place. Dry is very important, as moisture “activates” mushroom spores, meaning they will have a significantly shorter lifespan.
Keeping conditions airtight is important as well. Not only will this allow your prints to remain viable for longer, but it will also keep them sterile too! If they are not stored in an airtight manner, over time they will become more and more contaminated, making the likelihood of producing a successful flush lower.
In short, store them like a pack of very precious biscuits.
Spore print vs spore syringe
A spore syringe is the next stage of a spore print’s life (all going well). It is possible to store your spores in a solution inside a syringe, meaning they are immediately ready to be used when the time comes.
However, the time has to come fairly soon, as spore syringes have a maximum lifespan of a year, and often less. As the spores become activated in the water, they can't last indefinitely like spore prints. And they have to be kept in the fridge or they will go off very quickly.
If you know you want to use them soon, a spore syringe is certainly a viable way to keep spores. However, if you want genuine longevity, a spore print is a much better option.
Buying magic mushroom spore prints

Making spore prints from psychedelic mushrooms is very easy, and if you already grow your own shrooms, you should definitely try it.
But what if you don’t already have a supply of mushrooms to take prints from? Fortunately, we’ve got you covered. At the Zamnesia Shroomshop, you can buy shroom spore prints and have them delivered directly to your door! And once you’ve got them, you’ll find all the information you need to successfully grow magic mushrooms across the Zamnesia site. Happy cultivating!
-
 3 min
25 April 2022
What Is A Magic Mushroom Spore Vial?
Embarking on the journey of magic mushroom cultivation? One of the first things you need to do is source some spores. But should you choose a vial or a syringe? Here we explain the benefits of...
3 min
25 April 2022
What Is A Magic Mushroom Spore Vial?
Embarking on the journey of magic mushroom cultivation? One of the first things you need to do is source some spores. But should you choose a vial or a syringe? Here we explain the benefits of...
-
![How To Grow Magic Mushrooms Indoors [3 Methods]](https://www.zamnesia.com/uk/modules/prestablog/themes/responsive/up-img/slide_2060.jpg?fc662b267fa1db02d0875650f245cfe0) 5 min
22 February 2022
How To Grow Magic Mushrooms Indoors [3 Methods]
Growing magic mushrooms at home needn't be difficult. Here we look into three different growing methods, ranging from the beginner-friendly to the advanced. Whichever one you choose, big, healthy...
5 min
22 February 2022
How To Grow Magic Mushrooms Indoors [3 Methods]
Growing magic mushrooms at home needn't be difficult. Here we look into three different growing methods, ranging from the beginner-friendly to the advanced. Whichever one you choose, big, healthy...
-
 5 min
25 June 2021
How To Make A Magic Mushroom Spore Syringe
There are a couple of ways to inoculate a substrate to grow magic mushrooms. From ghostly liquid cultures to Petri dishes, it can be hard to decide which method is best when starting out. Using a...
5 min
25 June 2021
How To Make A Magic Mushroom Spore Syringe
There are a couple of ways to inoculate a substrate to grow magic mushrooms. From ghostly liquid cultures to Petri dishes, it can be hard to decide which method is best when starting out. Using a...
-
 4 min
17 September 2020
What Is Mycelium In Magic Mushroom Cultivation
If you've been looking into growing your own magic mushrooms, we're guessing you've seen the term "mycelium" come up in articles and forum discussions. Like a lot of concepts surrounding magic...
4 min
17 September 2020
What Is Mycelium In Magic Mushroom Cultivation
If you've been looking into growing your own magic mushrooms, we're guessing you've seen the term "mycelium" come up in articles and forum discussions. Like a lot of concepts surrounding magic...


