


-
 TRIBE
All CategoriesTRIBE
TRIBE
All CategoriesTRIBE
- My Membership
- Spend Gift Points
- TRIBE Sale
- Exclusive products
- Earn Extra Gift Points
- Early Access
- Refer a Friend
- Information
 United States
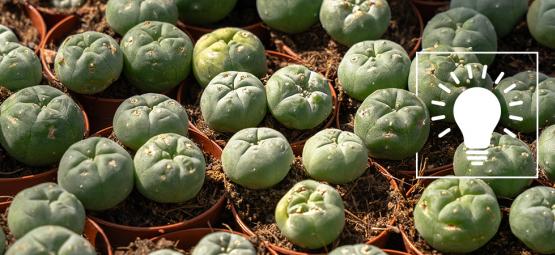
How to grow & care for peyote: A complete step-by-step guide


For thousands of years, peyote (Lophophora williamsii) has occupied a central role in the spiritual practices of our ancestors. While we do not recommend taking peyote in the same way that Native Americans did, growing it can be a great way to preserve and connect with this ancient, powerful plant.
Whether you consume peyote or not, cultivating it is a wonderfully rewarding practice. Not only is it a great way to preserve one of mankind's oldest spiritual plants, but growing peyote also helps sustain this vulnerable (and, in some regions, even endangered) cactus species.
Below, we’ll walk you through everything you need to know about peyote cultivation. You'll learn exactly how to germinate your seeds, care for seedlings, and even maintain healthy adult cacti. We'll also walk you through the different stages of a peyote cactus’ life and the tools needed to care for this species at home. An excellent resource for beginners and experienced cultivators alike, you can keep this guide handy and refer to it regularly as you grow your peyote plant.
Note that we’ll focus specifically on growing peyote cactus from seeds: a time-consuming, yet enriching experience. However, we understand if you don’t want to wait years for your peyote seeds to germinate and grow into viable specimens. That’s why we also stock live, rooted, juvenile peyote cacti. Learn the definition of a juvenile peyote cactus below, or order yours today, and jump into the long-term peyote care section to learn how to care for your peyote plant.
Peyote growth stages overview
The process of growing a peyote cactus is divided into the following stages:
- Germination (0–1 month). This stage of the peyote growing process involves caring for peyote seeds and providing them with the right conditions to sprout. Warmth and high humidity, sandy soil that drains well, and cool lights will do the trick.
- Seedling (1–12 months). After sprouting, peyote seedlings form into small, rounded, bright green balls. After 9–12 months, they can measure ½ inch in diameter and will start taking on their characteristic blue-green color and bump-like shape. Peyote seedlings like high humidity and indirect light, but can be gradually introduced to warmer conditions and stronger light over time.
- Juvenile (1–3 years). During this stage, peyote cacti develop more pronounced tubercles and form the classic, button-like shape that makes this species so recognizable. Juvenile peyote cacti can handle more light exposure and drier conditions, but a well-draining, sandy soil remains essential.
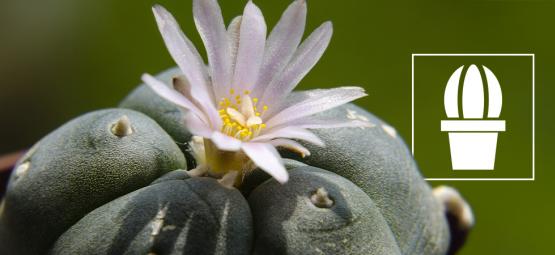
- Mature cactus (3+ years). A peyote cactus is considered mature once it begins flowering, which can happen anywhere between 3–5 years after germination (or even longer in the wild). Mature plants can measure 2–4 inches in diameter, have well-formed tubercles, a blue-green/grey-green color, faint ribs, and produce pink or white flowers. Healthy, mature specimens also produce offsets known as “pups.”

We can’t stress this enough: Peyote is an extremely slow-growing cactus, so caring for it requires a lot of patience. Don’t grow this plant if you’re looking for quick results. Instead, think of growing peyote as an exercise in committing to something for the long term and celebrating every step forward (no matter how small). A good overall life lesson, no?
Also, remember that peyote is native to hot, arid regions; cultivating peyote in a temperate climate may further slow growth. If you live in a cooler environment, you must keep your peyote cactus inside for all or most of the year. While the guide below will teach you how to germinate peyote seeds and care for seedlings, jump straight into the section on long-term peyote care if you've bought a cutting or potted peyote plant.
What you need before you start
Ready to start cultivating peyote? Below is a checklist of all the materials and tools you’ll need:
- Peyote seeds
- Well-draining small pots (2–3 inches), or seedling trays with drainage holes
- Cactus soil mix
- A heat source (e.g. heat mat or space heater)
- A humidity dome or plastic to trap moisture during the germination and seedling phase
- A spray bottle, for misting seedlings
- A grow light (if sunlight is limited)
How to germinate peyote seeds

Peyote seeds need warm, humid conditions and a well-draining, sandy soil. While you might have learned to germinate seeds from other plants (like cannabis, for example) using a moist paper towel or water, we recommend germinating peyote seeds directly in their soil.
Below is a step-by-step guide on how to do so:
- Soak your seeds (optional but preferred): Soaking peyote seeds can help loosen their hard outer shells and improve germination rates. To do so, place your seeds in lukewarm water for 12–24 hours.
- Prepare your pots/seedling trays: Moisten your cactus soil and fill your containers, pressing down on the soil very gently. It should be moist to the touch but not overly wet, and firm but not heavily compacted.
- Sow the seeds: Lay your peyote seeds into the soil, spacing them ½–1 inch apart. Do not bury the seeds; however, you may press them gently into the soil so they’re completely in contact with it.
- Create a warm, humid environment: Cover your pots using a humidity dome, a piece of plastic, or an upside-down tub. Mist the inside to drive up the humidity. Peyote seedlings like high relative humidity of 80–100%.
- Provide light and heat: Peyote seeds need light to germinate, so place your pots or trays under soft CFL grow lights or near a bright windowsill. Maintain a soil temperature of 68–86°F, using a heat mat or space heater if necessary, and track the temperature and RH of your space using a thermohygrometer.
- Mist regularly: Mist the top of your grow tray every few days. Do not let the soil dry out, but do not let it get too wet either, as this can promote mold and bacteria growth.
Like all aspects of growing peyote, germinating your seeds takes time and patience. There’s no “standard” period within which peyote seeds sprout. However, give them the right conditions and avoid disturbing them; you should see little green peyote seedlings popping out of the soil within 1–8 weeks.
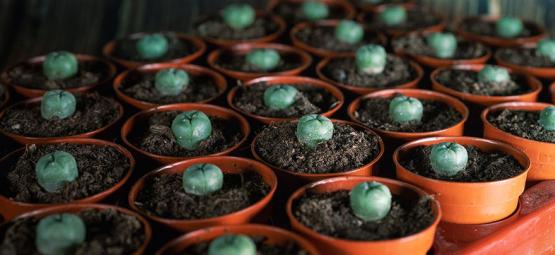
Caring for peyote seedlings (first year)
.jpg "Caring for peyote seedlings (first year)")
Like other plants, peyote seedlings are very fragile, so knowing how to meet their needs is very important. Below, we’ll walk you through the first year of a peyote’s growth.
- Ventilate gradually: Once your seedlings emerge from the soil, gradually introduce fresh air into their containers over 1–2 weeks. You can do this by removing the cover from the trays daily to harden your plants and prevent the mold. You should be able to leave your peyote seedlings completely uncovered 1–2 months after they germinate.
- Keep your seedlings in a well-lit space: Young peyote plants are fragile and like cool, indirect light. Direct light from the sun or a grow light, on the other hand, will scorch (and possibly kill) them.
- Water correctly: For the first 1–2 months following germination, aim to keep your peyote seedlings’ soil moist at all times. Do this by regularly spraying their topsoil with filtered water. As they mature and harden, you should be able to let your seedlings’ soil dry out completely before watering them again. Remember, overwatering peyote seedlings can cause root rot, so it’s always better to err on the side of caution.
- Keep the temperature and humidity stable: Peyote grows well at 68–86°F. Once your seedlings are 1–2 months old, avoid high humidity to prevent the growth of bacteria and mold.
- Do not fertilize: Young peyote plants are very sensitive; all they need during their first year of growth is water and high-quality cactus soil. Do not feed them to avoid damaging their young roots and stunting their already slow growth.
Unlike other plants, peyote shouldn’t be transplanted or otherwise disturbed during its first year of growth. The only exception is if you spot signs of mold in your grow medium. In this case, carefully transplant your seedlings, mist them with chamomile tea, then plant them into fresh soil in clean containers. See the section on transplanting below to learn how to dispose of rotting peyote roots.
Don’t worry if your peyote seedlings are still very small after their first year of growth. It’s very common for year-old peyotes to measure around ½ inch in diameter. As mentioned earlier, patience is a virtue when growing peyote, so get ready to celebrate small signs of growth!
Transplanting young peyotes (after 1–2 years)
If you’ve made it this far, congratulations! After 1–2 years, your young peyote plants should be strong enough to consider transplanting.
Of course, the exact time your peyotes require a new home will vary depending on their growth as well as the size of the initial containers you started with. Nonetheless, it’s important you meet their demands for more space to allow your peyote plants to grow new, stronger roots and avoid becoming root-bound.
Remember that, like all plants, peyote is best transplanted during its active growing season (spring or summer). This minimizes the inevitable stress of being dug up and replanted and ensures your young plants will recover quickly.
Here’s how it’s done:
- First of all, check whether your peyotes need transplanting. Visible signs that they are outgrowing their containers include the appearance of roots near the drainage holes on your pots, stunted growth, or buttons that physically outgrow the edges of their containers.

- Stop watering your cacti and let their medium dry out for 3–5 days. This will make it easier to handle them and separate their roots from the soil without causing any damage.
- Pick a container that’s around 1 inch larger than the one your seedlings are in. Fill it with dry cactus soil with excellent drainage and minimal organic matter.
- Remove your peyote from its original container by turning it upside down and tapping or agitating the bottom of its pot/tray. Never try to pull your cactus from the soil by yanking at its body, as you’ll risk breaking its tender roots.
- Once you’ve removed the cactus, inspect its roots. If you see any signs of rotting (black or mushy roots with a foul smell), trim them using sterilized scissors. Do the same if your cactus’ roots have grown into a tangled ball.

- Gently place your peyote inside its new container (you may need to remove some soil first). Set the peyote inside, then fill around the cacti with soil. Do not press down or otherwise compact the soil.

- Let your peyote rest in dry soil and shade for 4–7 days to recuperate from being transplanted.
- Lightly water your plants after approximately 7 days and slowly reintroduce them to direct light. Resume regular care once the plants look stable.
Long-term peyote care (beyond the first year)
")
After learning how to grow peyote, caring for your cactus really comes down to some basic seasonal maintenance.
During spring and summer, water your plants only when their soil is bone dry. Gradually expose young plants to full sunlight; mature plants can be left in full sun all season. Also, feed your peyotes once per season using diluted cactus fertilizer, and remember to repot any plants that have outgrown their container.
Then, during autumn or winter, stop watering your peyotes and move them to a slightly cooler space (50–59°F). Do not fertilize or repot your plants during these seasons. For the best result when growing and caring for peyote, try to mimic the natural growing conditions of the hot, arid conditions where the species comes from.
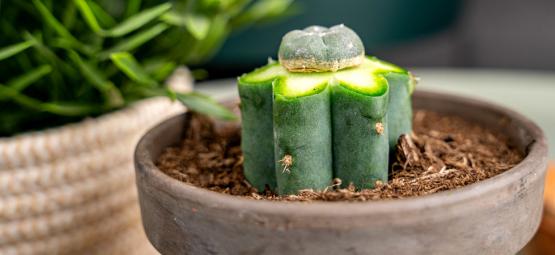
How to harvest peyote
.jpg "How to harvest peyote")
Peyote has a rich history of use among the native tribes of North America. Its use continues to attract psychonauts and anyone with an interest in psychedelics.
Generally, the peyote used in spiritual ceremonies comes from very mature cacti. Hence, it’s best to wait at least 5–10 years before harvesting a piece of peyote from one of your plants. When you do, make sure to pick specimens with a diameter of at least 2–3 inches and clearly formed crowns.
Here’s a step-by-step approach to harvesting peyote:
- Sterilize a sharp blade or scalpel with isopropyl alcohol.
- Select the piece you want to harvest and make a precise, clean incision right above the root button. This is very important as leaving the roots intact allows the cactus to grow back slowly over time.
- Only harvest peyote once from a single cactus. Make sure not to damage any other tissue other than that which you wish to use.
- Let your cactus heal. Soon after cutting, you should see a cork-like callus form over the incision you made. Wait at least 2–4 weeks for the wound to callus over completely before doing anything else to your cactus. With plenty of time and good care, harvested peyote cacti can regrow completely.
Note that, while this process is commonly used to harvest peyote for consumption, you can also use it to make peyote clones or cuttings. Learn more about grafting peyote here.
Troubleshooting common peyote growing problems
Once mature, peyote is a hardy cactus that’s easy to grow and care for at home. However, during the seedling phase and the first year of growth, poor environmental conditions can cause some problems. Most issues can be resolved with close observation and gentle care, so don’t be discouraged if challenges arise early on.
These include:
- Overwatering: Giving cacti too much water and the root rot that follows is one of the most common peyote growing mistakes. Luckily, avoiding overwatering is simple: allow your cacti’s soil to dry out completely before giving them more water. If your peyotes show signs of root rot (mushy or blackened roots, yellowing seedlings), trim their affected roots and transplant them into new containers with fresh, clean, dry soil.
- Underwatering: Peyotes, like other cacti, are very drought resilient. However, they can still dry out if neglected. If your peyotes show signs of shriveling, mist them gently, lightly water their soil, and adjust your watering schedule accordingly.
- Light stress: Exposing young plants to direct sunlight or strong grow lights can scorch them, resulting in bleached, pale, or crispy tissue. If you spot any of these symptoms, move your cacti into the shade, give them a few days to recover, and gradually introduce them to more light exposure.
- Etiolation (stretching): Long, stretchy growth means your peyotes aren’t getting enough light. Gradually introduce them to longer hours of direct sun, or supplement with grow lights if need be. Mild signs of stretching usually resolve themselves once your plants are exposed to a stronger or more consistent light source.
")
Patience and care: The keys to growing peyote
Growing peyote cactus at home is a great way to connect with one of humanity’s oldest, most important spiritual plants. Though it calls for plenty of patience, the experience is deeply rewarding and accessible to anyone who’s cared for other varieties of cacti. So, what are you waiting for? Start your own peyote-growing journey today, or take some time to learn more about this fascinating cactus. Happy growing!
-
 5 min
August 11, 2025
Peyote consumption: Everything you should know before considering use
This article explores the use of peyote in both traditional and modern contexts. Note that Zamnesia does not promote the use of peyote or other psychedelics. This content is for educational and harm-r ...
5 min
August 11, 2025
Peyote consumption: Everything you should know before considering use
This article explores the use of peyote in both traditional and modern contexts. Note that Zamnesia does not promote the use of peyote or other psychedelics. This content is for educational and harm-r ...
-
 5 min
July 29, 2025
What is peyote and why do people use it?
Curious about peyote? Learn about the history, origins, and use of the mescaline cactus below. From ancient American tribes to modern-day rituals, peyote continues to play an important role in human s ...
5 min
July 29, 2025
What is peyote and why do people use it?
Curious about peyote? Learn about the history, origins, and use of the mescaline cactus below. From ancient American tribes to modern-day rituals, peyote continues to play an important role in human s ...
-
 4 min
November 25, 2024
How to Graft Peyote Cactus
While peyote is fairly easy to grow, it takes many years to reach maturity. Grafting can significantly speed up growth—tripling or even quadrupling the rate of maturation! Keep reading to find out m ...
4 min
November 25, 2024
How to Graft Peyote Cactus
While peyote is fairly easy to grow, it takes many years to reach maturity. Grafting can significantly speed up growth—tripling or even quadrupling the rate of maturation! Keep reading to find out m ...
-
 2 min
November 15, 2014
The Long-Term Effects of Peyote Use on the Brain
Peyote has been used for entheogenic practices for thousands of years - but what effect does such use have on the brain? ...
2 min
November 15, 2014
The Long-Term Effects of Peyote Use on the Brain
Peyote has been used for entheogenic practices for thousands of years - but what effect does such use have on the brain? ...


- Peyote growth stages overview
- What you need before you start
- How to germinate peyote seeds
- Caring for peyote seedlings (first year)
- Transplanting young peyotes (after 1–2 years)
- Long-term peyote care (beyond the first year)
- How to harvest peyote
- Troubleshooting common peyote growing problems
- Patience and care: The keys to growing peyote


