
-
 Vaporshop
All CategoriesVaporshop
Vaporshop
All CategoriesVaporshop
- Top 10 Vaporizers
- Spare Parts & Accessories
- AirVape X
- AirVape XS GO (2021)
- Arizer Air MAX
- Arizer Extreme Q
- Arizer Solo 2
- Arizer V-Tower
- Arizer XQ2
- Boundless CFC 2.0 Vaporizer
- Boundless CFX
- Boundless TERA (V3)
- CRAFTY+
- DaVinci IQ2
- DaVinci IQC
- DaVinci MIQRO
- Dr. Dabber Boost EVO
- Dr. Dabber Stella
- DynaVap Omni 2021
- Dynavap The "B" Series
- DynaVap VapCap "M" PLUS 2023
- DynaVap VapCap 'M' 2021
- DynaVap VonG (i) Titanium
- Eagle Bill
- Firefly 2+
- Flowermate Aura
- Flowermate Cap Pro
- Flowermate Slick
- Flowermate V5.0S Pro
- G Pen Connect
- G Pen Elite II
- G Pen Micro+
- G Pen Pro
- G Pen Roam
- Hydrology9 Vaporizer
- Hyer Big-E Rig
- MIGHTY
- MIGHTY+
- Pax 3 Vaporizer
- PAX Mini
- PAX Plus
- PLENTY
- Puffco Peak PRO Smart Rig
- Puffco Peak Smart Rig
- Puffco Plus
- Storm Vaporizer
- The Proxy (Puffco)
- Vape-Lifter
- VaporGenie
- VOLCANO CLASSIC
- VOLCANO HYBRID
-
 Smartshop
All CategoriesSmartshop
Smartshop
All CategoriesSmartshop
- Top 10 Smartshop
- Zamnesia Gift Cards
- After Party
- Aphrodisiacs
- Aromatherapy
- Blue Lotus
- Capsule Machines
- CBD Vape Juice
- Dream Herbs
- Drug Tests
- Extracts
- Happy Caps
- Herbal Tea
- Herbs & Seeds
- Incense
- Kanna
- Kratom
- LSA Seeds
- Mescaline Cacti
- Microdosing
- Nootropics
- Relaxing
- Salvia divinorum
- Smart Seeds
- Stimulants
- Supplements
- Tinctures
- Vape Herbs
-
 Plantshop
All CategoriesPlantshop
Plantshop
All CategoriesPlantshop
- Top 10 Plantshop
- All Seeds
- Accessories & Grow Supplies
- Cacti
- Chili & Pepper Seeds
- Dried Chillies, Seasonings & More
- Edible Plant Seeds
- Exotic Seeds
- Flower Seeds
- Fruit Seeds
- Herb Seeds
- Hot Sauces
- Interior Plant Seeds
- Medicinal Plant Seeds
- Companion Plants
- Microgreens
- Psychoactive Plant Seeds
- Sprouting
- Vegetable Seeds
 Seedshop
 Headshop
 Healthshop
 Shroomshop
 United States
How To Prepare The Zamnesia Outdoor Cultivation Kit


Using your Zamnesia Outdoor Cultivation Kit to grow magic mushrooms could not be simpler. All you need is some time and patience. Once prepared, the cultivation kit will provide annual harvests year after year – all with extremely low maintenance. So follow these steps, prepare your magic mushroom patch, and watch you mushrooms flourish.
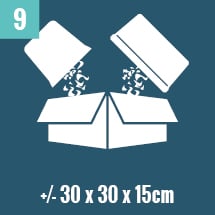
The Zamnesia Outdoor Cultivation Kit contains mycelium, ready to inoculate your substrate for an outdoor mushroom patch. In addition to this you will need: a 10L bag of 6mm beech woodchips (often available from pet stores as animal bedding), 1 ordinary cardboard box, max depth 15cm (30 x 30 x 15cm is ideal), a plastic bag, patience.
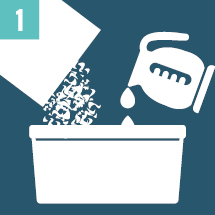 |
STEP 1Take a 1L plastic container (with lid) and fill the majority of it with woodchips – you need to leave some room for the mycelium to be added later. Now fill the container with boiling water. |
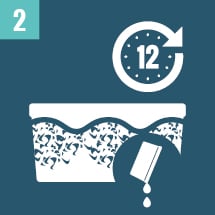 |
STEP 2Leave chips (submerged) overnight to cool down. |
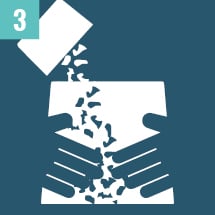 |
STEP 3Now wash your hands, take your container of mycelium, and break it up by putting the content in the plastic bag and squeezing it gently. |
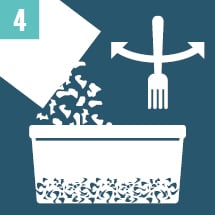 |
STEP 4Distribute the mycelium over the moist woodchips. Once you have poured it all in, use a clean fork, or something similar, to evenly mix the mycelium and woodchips up. |
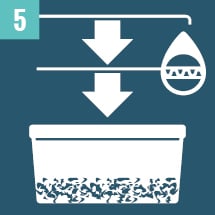 |
STEP 5Once mixed, cover the woodchips with a layer of wet cardboard. Loosely place the lid on the container – so that the mycelium is protected, but can still breath. Important! Without air, the mycelium will not grow. |
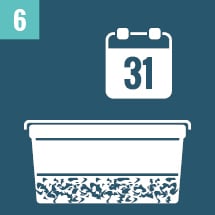 |
STEP 6Leave the container in a clean, dust-free area, for one month to allow the woodchips to become fully colonised. Room temperature is recommend for this stage. You will know when it is fully inoculated as the contents will have turned white. Your substrate is now ready to be used outdoors. |
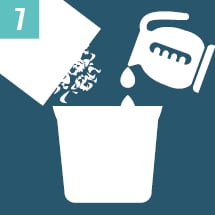 |
STEP 7Pour the rest of your beech woodchips into a large bucket and submerge them in boiling water. |
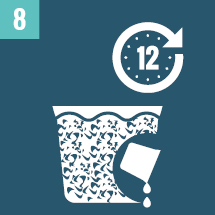 |
STEP 8Allow the woodchips to sit in the water overnight. Once done, drain the water. |
 |
STEP 9Fill your cardboard box with both your inoculated woodchips and your moist woodchips. |
 |
STEP 10Using a clean fork, or something similar, mix everything up so that the inoculated substrate is evenly spread throughout. |
 |
STEP 11Bury the (open) box somewhere OUT of direct sunlight. If you want to really give your patch the best chance possible, add a 1cm top layer of moist soil. |
Maintenance
Your prepared mushroom patch is easy to maintain. Over the years, it will likely spread, and it will even be possible to transplant growth to new locations. With proper maintenance, a patch can even outlast a human lifetime! The best way to maintain it is to ensure that the patch is always moist. To do so, stick your finger about 3cm in every now and again. If it feels dry, add water to the patch. When the frosts begin to settle, it is a good idea to add a layer of woodchips to the top of the patch. The mycelium will be protected under the ground, but the chips offer additional nutrients for next year’s harvest.
Most patches can be left to their own devices for most of the year, and if you have chosen a good location, they should never dry out. Bad weather may ruin or lessen a year’s harvest, but the mycelium will be safe for the next harvest. The only time the patch will need regular attention is during harvest.
Note: do not use chemical fertilisers or pest repellents near your patch. They could contaminate the harvest.
Harvesting:
Magic mushroom fruiting usually begins around November, carrying on until the first frost. You should be able to get 2-3 full flushes a year, depending on conditions; this can be extended by placing a small greenhouse like structure over your patch. The ideal time to pick a mushroom is just before the veil breaks, but this can be hard to time outdoors, so a good practice is to pick any mushroom that looks mature. To do so, gently grasp the mushroom between thumb and forefinger at the base of the stem. Softly twist and pull in an upwards motion. Once harvesting has begun, check back daily to see if new mushrooms have sprouted.
WARNING: with time, you may see other types of mushrooms appearing, through contamination. Be careful and ensure you know what you are picking!


